

I love the kind of DIY projects that are quick, easy, and turn out looking great. It’s as close to instant gratification as you can get in the crafting world. An extra bonus is if it is inexpensive an well. With that being said, here is a simple step-by-step tutorial that is all those things. It’s an adorable growth board you can easily make to measure your kids as they grow. It’s also a great Cricut project to give as a gift, and perfect if you don’t have a lot of time but want to give something thoughtful. I’ve also included the free PNG image to import into your Cricut Design Studio.

Easy Cricut Project for Beginners to Experts

If you love to craft and don’t own a Cricut yet I would totally encourage the investment. You’d be surprised at how many things you will use it for. I have used mine for so many projects from shirts to signs, from personalized blankets to team banners for my kids’ sports. Really!
I’ve also made many gifts because I love giving handmade items for birthdays, special occasions, and holidays.
A Few More Ideas for Cricut Projects

- Trucker hats (customized by you)
- Comfy shirt (customized by you)
- Signs
- Ornaments
What You Need For the Growth Board Cricut Project

- 1- 6’ fence board (found at Home Depot or Lowe’s)
- Course sand paper
- Adhesive vinyl (I used permanent but removable works too)
- Transfer tape
- Acrylic paint (I used black)
- Sharpie or paint pen (I used black)
Growth Board Tutorial
Step #1: Sand your board.

The first step for your Cricut project is to grab a piece of course sand paper and give your board a good sanding to even out the surface and give it a smoother finish.
You can also use a sander if you have one and are comfortable operating it.
Step #2: Stain or paint your board (optional).

I did not stain or paint my board for this project. Instead, I simply left it in its natural state after sanding it.
However, if you prefer to stain or paint your board for a different look you totally can.
Step #3: Pencil in your measurements.


I simply used a standard 12” ruler and a pencil to mark my measurements.
Important: in order to account for the baseboard when hanging the growth board on the wall I started my measurements at 6”. That way the bottom of the board would be hung 6” above the floor and flush to the wall.
I marked every half inch, using the longest lines for the foot mark, a shorter line for an inch mark, and the shortest line to identify the half inch increment.
Step #4: Paint your line measurements.


After marking my measurements in pencil I grabbed my ruler again to use as a guide for straight lines.
You can use a paint pen or a sharpie to draw your measurements in. I prefer the look of the paint pen.
I painted in all of the measurements except for the foot increments, which I will fill in after I add the lettering.
Step #5: Create the lettering with Cricut

In my Cricut design space I created the letter template. I used Babette font and adjusted each word to the size I wanted, approximately 3” x 1.5”.
Then I made the cut with my Cricut machine on adhesive vinyl.
Note: I decreased the letter spacing to condense the words and give it a better cursive look.
Step #6: Apply your stencil.
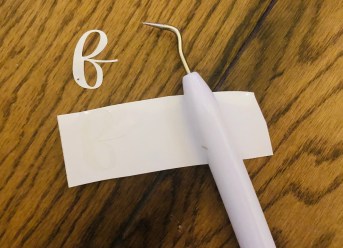
To use your Cricut cut as a template you must remove the vinyl letters to create a stencil. It is easiest to do this with your Cricut tool.

Once removed your stencil will look like this.

Next, cut out a piece of transfer paper and apply it on top of your stencil. The best method is to start in the middle and smooth it out with your Cricut tool.

Peel your stencil off of the backing so that it is now on your transfer paper.

Center your stencil on your board at the foot marks. Be sure to use your Cricut tool to get a smooth application which prevents the paint from bleeding.
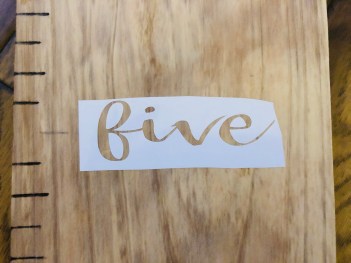
After removing the transfer paper your stencil is ready to be put to use.
Step #7: Paint on your lettering.

I have found that it is best to use a small paint brush for this process. Simply use it to fill in your stencil lettering with your black acrylic paint.

Repeat this for each of your stencils. Then allow the paint to dry completely before moving on.
Step #8: Remove your stencil and add your foot markers.

Once your paint is dry you can remove your stencil.

Next, using a ruler and a paint pen you can paint on your foot markings.

Repeat this for each foot.

Ta-da!! That’s a wrap for this Cricut project. You now have a finished growth board to track your kids’ measurements. It also makes a great gift for any growing family.
Grow with us! Enter your email to get our updates and never miss a blog post 😉
Visit more of our DIY tutorial pages + home decor you will love.


Loved it. I can’t waitbl to try it. 😍
❤️❤️❤️